Hilary Cadman Member of the National Association of Independent Writers and Editors
Menu
  • Home
  • Blog
  • Services
  • HIRE ME!

Making the most of comments in MS Word #TOOLS

October 6, 2020

Most editors will be familiar with the basics of using comments in MS Word, such as adding, deleting or responding to comments. But there are a few things you can do to make working with comments easier for you and your clients.

Make comments easy to read

When working in MS Word you may sometimes find that the text in the comments boxes is annoyingly small. You could select the text and make it bigger, but there’s an easier solution. The size and font of the text used for comments is actually a style within Word, which means you can change it to make it more readable.

Here is one option for amending the comment style:

  1. Put your cursor in a comment and select the text.
  2. Click on the little arrow at the bottom of the Styles group on the Home tab.
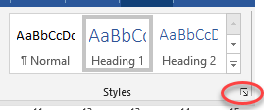
  3. A Styles box will open. If you can see ‘Comment text’ in that list, just click on the drop-down arrow next to that style to modify it, to make it easier to read (e.g. change it to a larger size).
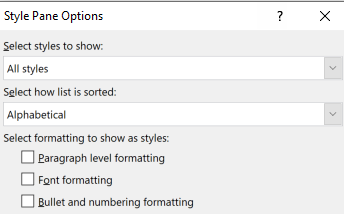
  4. If ‘Comment text’ is missing from the list of styles, you can make it appear by doing the following:
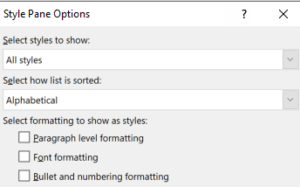
    • Click on the ‘Options’ button at the bottom of the Styles box shown above.
    • The ‘Style Pane Options’ box will appear – choose ‘All styles’ in the first drop down list and ‘Alphabetical’ in the second, as shown here (also make sure that the 3 boxes below those list are unticked). Click ‘OK’ to apply those changes.
    • Now, if you highlight some text in a comment and then click on the little arrow at the bottom of the Styles group on the Home tab, you should see ‘Comment text’ in the list (and the list will now be alphabetical, so will be easier to search).

Make it easy for clients to see the comments

When I’ve made numerous comments in a document, I often find that a client will respond to only some of those comments. To ensure that clients see and respond to all the comments, I put the comments into a table in a separate document, and send that to the client alongside the edited document. I offer the client the option of responding in the comments table or in the edited document, whichever they prefer.

Here are a couple of ways to put all the comments into a table:

  • use PerfectIt to create a list of comments in Word, then turn them into a table; I do this as follows:
    • use ‘Find and Replace’ to replace double paragraph marks with singles
    • select all the text, then go to ‘Table’ on the ‘Insert’ tab and select ‘Convert text to table’
    • in the table you have created, add a column on the right (for responses) and a header row at the top
    • title the columns ‘Comment’ and ‘Response’ to the header row
  • if you’re comfortable with macros, install the macro ‘CommentCollectTabulated’ from Paul Beverley’s free Macros book to create a well-laid out table in a single step.

Categories: Uncategorized

Three reasons for editors to learn EndNote #TOOLS

September 21, 2020

For academic and technical editors, reference management programs are like pineapple on pizza – you either love them or hate them. In the past, when a project arrived with references in EndNote or some other referencing management program, I would ask the author for a plain text version I could edit. Now, I’ve learned to love the pineapple that is EndNote, for three main reasons.

1. Renumbering is easy with EndNote

Have you ever gone through a document meticulously adding Vancouver-style numbered references, and then needed to rearrange some of the content? Deleted a section and needed to renumber references in the remaining text? It’s a time-consuming job. What if all those references renumbered automatically for you, instantly? EndNote will do that.

2. Ensuring that references are accurate is easier with EndNote

The occasional typo in a year or an author’s name can become a compound error when an author uses that reference multiple times in different documents. Adding references manually is a risky business  – a 2010 study found over 600 different mis-citations for a popular biochemistry article! Using EndNote ensures that the basic information is correct, because journal articles and books are downloaded straight from the source into the EndNote program. Also, if all the in-text citations are live EndNote links, the reference list automatically matches those citations, avoiding the need for cross-checking.

3. Referencing style is easily changed with EndNote

When submitting a paper to a journal, the author needs to format the references to match the journal’s style. It’s not uncommon to make more than one attempt to get a paper accepted, and reformatting the references to suit can be a huge chore. Imagine it was possible to select the desired referencing style and click a button to update them the references throughout the document. That process is easy with EndNote.

How does EndNote help editors?

Academic and technical editors have much to gain from learning to use EndNote in Word. Editors who are confident in the program can:

  • work effectively with authors who are using EndNote
  • pursue more job opportunities where EndNote skills are a listed requirement
  • save time and improve the quality of the final product by offering to create an EndNote database for managing large reference lists.

…………………………………………………………………………………………………

Keen to learn more? My free Endnote extras mini course is a great place to start, and if you want to get serious about using the program, NAIWE members receive a 25% discount on the EndNote for editors course (to receive the discount, sign in as a NAIWE member and go to the member benefits section).


Categories: Uncategorized

Where did my header and footer go?

September 9, 2020

See what you need to see in Print Layout view

When you’re editing, you might find it handy to get the headers and footers out of the way. Once you’ve checked that the header and footer have all the relevant information needed for the document, and the page numbering is correct, you don’t need to see those elements on-screen. When you’re focusing on the body of the text, all that extra space can be distracting. Modifying your Print Layout view has a few advantages.

How to make Print Layout View work for you

An ideal way to focus only on the main document text is to get rid of headers and footers while you work. You can just minimise all the white space at the top and bottom of the screen when you don’t need it. Simply double-click in the space between pages to hide the header and footer area from view.

I’ve made a quick video to show you how to do it.

Working in this modified view:

  • makes it easier to focus on the text
  • allows you to see more of the text on the screen, so don’t have to do so much scrolling
  • means that if a table or a set of bullet points is split over two pages, you can more easily see it as a whole.

Playing peek-a-boo with page numbers?

Not everyone knows how to show and hide the white space. To help your clients, make sure you bring the header and footer back before saving your document.

A client once asked me to add page numbers to a document, when the page numbers were already there. My client had been sent a document that was saved in the modified page layout view, with headers and footers hidden. I simply saved the document with the page numbers showing, and sent it back with a note about why the problem had occurred.

Remember to double-click and expand that white space again before saving and sending your document elsewhere.

Know someone who works in MS Word and might find this information helpful? Feel free to share these tips and make someone’s day!

Categories: Uncategorized

Tools for editors – how to not track formatting changes #TOOLS

August 25, 2020

As an editor, you probably work with track changes turned on in Word. However, you may not need to track every change. For example, clients might be happy for you not to track things such as removal of double spaces or changes to formatting. Not tracking those things means the client can focus on the more substantive changes that really matter; it also makes the resulting file look less overwhelming for the client.

Here’s an easy way to turn off tracking of formatting changes at the start of a job, and a trick for accepting the formatting changes if you forgot to do that.

How to turn off tracking of formatting

It’s easy to turn off tracking of formatting.

  1. Go to the Review tab and find the Tracking group, then click on the little arrow in the bottom right-hand corner of that group.
  2. The ‘Change Tracking Options’ box will open. In that box, click on ‘Advanced Options’.
  3. The ‘Markup’ box will open. Near the bottom of that box, on the left, you will see the ‘Track formatting’ option. Simply untick that option, then click ‘OK’ to get out of the Markup box and again to get out of the Change Tracking Options box.

How to accept only the formatting changes

If you are part way through a project and realise you forgot to turn of ‘Track formatting’, all is not lost. You can accept those formatting changes and leave everything else tracked.

  1. In the Review tab, go to the Tracking group, and this time click on the arrow next to ‘Show Markup’.
  2. This list will appear. By default, ‘Comments’, ‘Insertions and Deletions’ and ‘Formatting’ will be ticked. Untick ‘Comments’ and ‘Insertions and Deletions’, but leave ‘Formatting’ ticked, then click anywhere to close the list. Now the only changes visible in your document will be the formatting changes.
  3. Still on the Review tab, go to the ‘Changes’ group and click on the arrow under ‘Accept’.
  4. This list will appear, and you simply click on the option ‘Accept All Changes Shown’ to accept those formatting changes
  5. If you want to see your other changes, just go to ‘Show Markup’, click on the arrow, and tick ‘Comments’ and ‘Insertions and Deletions’.

Categories: Uncategorized

Getting organised #BIZ

May 25, 2020

I’m good at making to-do lists, but not at completing the tasks listed. I remember one item (find a carpenter) featured on my to-do list for about 5 years – it only dropped off the list when I moved house and it was no longer relevant! After trying all sorts of different things (handwritten lists, whiteboards, journals, dedicated apps), I have now settled on the kanban system, which I came across in an article in the Guardian.

The basic idea is that you create three columns: To do, Doing and Done. You then put all your tasks in the To do column. Each day, you choose three tasks to put into the Doing column; once you have completed a task, you move it to the Done column.

The pic shows an early version of my  system, using a whiteboard and sticky notes. Since then I have bought a set of multicoloured sticky notes, so my Done column is now a riot of colour with a mass of overlapping notes, which is very satisfying! However, I’m beginning to find it harder to motivate myself to bother to write down tasks. Alternatively, I find myself sabotaging the system by doing a task that’s not in my Doing column.

No doubt there are other helpful systems out there, if you have a good alternative, I’d love to hear about it.

Categories: Uncategorized

Recent Posts

  • Making the most of comments in MS Word #TOOLS
  • Three reasons for editors to learn EndNote #TOOLS
  • Where did my header and footer go?
  • Tools for editors – how to not track formatting changes #TOOLS
  • Getting organised #BIZ

Monthly Digest

Meta

  • Log in
  • Entries feed
  • Comments feed
  • WordPress.org

Latest Posts

Making the most of comments in MS Word #TOOLS

October 6, 2020

Three reasons for editors to learn EndNote #TOOLS

September 21, 2020

Where did my header and footer go?

September 9, 2020

Tools for editors – how to not track formatting changes #TOOLS

August 25, 2020

Getting organised #BIZ

May 25, 2020

Contact Us

  • 804-476-4484
  • P.O. Box 412
    Montpelier, VA 23192-0412
Facebook Instagram Linkedin twitter

© NAIWE. All rights reserved. Designed by My House of Design.